React에서 날씨 앱을 구축하는 방법
If you want to master crucial web development skills like working with API's, fetching data, and asynchronous functions such as async and await in React, then building a weather app is the best way to learn.
It is also a fun project since you get the see real-time weather and weather forecasts.
In this tutorial, we will use React to build a fully functional weather app that will show the weather for any city and as a 5-day weather forecast for the city.
In addition to knowing whether it will rain tomorrow ?, you will also learn these concepts:
- How to communicate with external APIs
- Data fetching in React
- Asynchronous operations and the mysteries of async and await.
By the end of this tutorial, you'll have build an app that looks something like this:
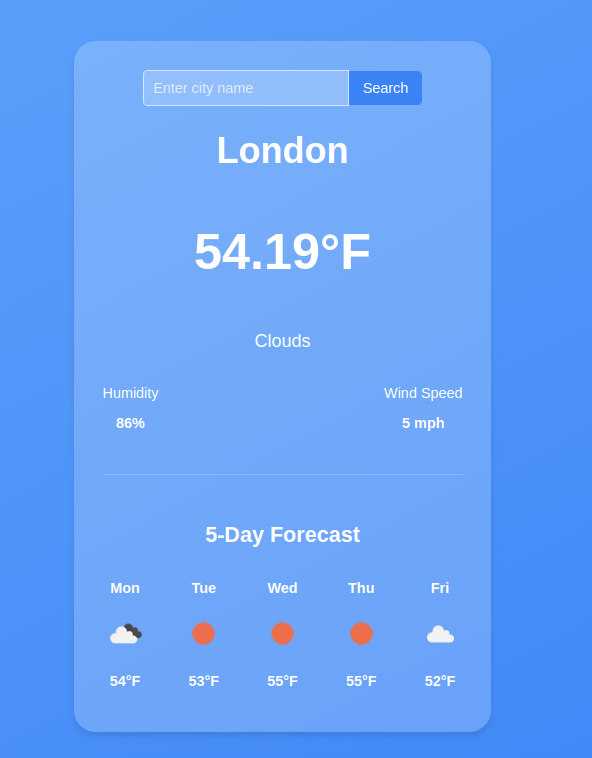
If you need to brush up on your React fundamentals, read this Tutorial:
Getting Started with React: A Beginner's Complete Guide
Let's get started.
Development Environment
Vite is a build tool designed for a faster and more efficient development experience. It comes with a dev server that enhances native ES modules with capabilities like extremely fast Hot Module Replacement (HMR) and a build command that utilizes Rollup to bundle code into highly optimized static assets for production.
In your terminal, issue this command which will create a new application called react-weather
npm create vite@latest react-weather
In the next step, select Reat as the framework and JavaScript as the variant.
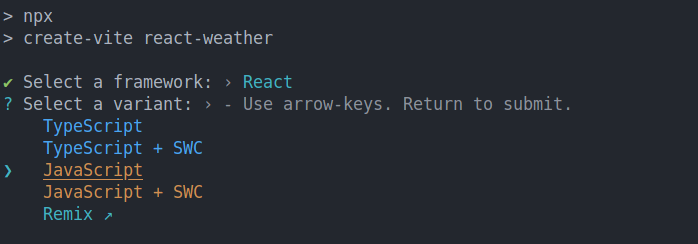
Once Vite creates the application, cd into the react-weather folder and run npm install and npm run commands.
 cd react-weather
 npm install
 npm run dev
Now your application should be running at http://localhost:5173/
Building the Interface
We will start by building the UI, in your app.jsx file, and delete all the content in the returned fragment. Your app.jsx should now look like this:
import { useState } from 'react'
import './App.css'

function App() {

  return (


    >
  )
}

export default App
The UI will have 3 sections.
- Header: this will show the city, temperature, and weather conditions
- Weather details section: this section will show the Humidity and wind speed
- Forecast section: this will show the weather forecast for the next 5 days for each city. Each day will show the temperature and weather conditions (cloudy, sunny, overcast) and so on.
Inside the return statement, let's start by adding a wrapper div. This div element will contain all the sections:
import { useState } from 'react'
import './App.css'

function App() {

  return (


  )
}

export default App
Inside the wrapper, add a header with an
to display the city, a element for the temperature, and another/>for the overall weather condition.import { useState } from "react";
import "./App.css";
function App() {
return (
London
60°F
Cloudy
);
}
export default App;
In the details section, we want to display the humidity and the wind speed in a row, so each will be in its div element.
export default App;

import { useState } from "react";
import "./App.css";

function App() {
  return (


        London
        60°F
        Cloudy


          Humidity
           60%


          Wind Speed
          7 mph


  );
}
Lastly, the forecast section will have a title and a couple of list items for each day. For the list items, let's start by displaying two days for now.
export default App;

import { useState } from "react";
import "./App.css";

function App() {
  return (


        London
        60°F
        Cloudy


          Humidity
           60%


          Wind Speed
          7 mph


        5-Day Forecast


            Monday
            Cloudy
            12°F


            Monday
            Cloudy
            12°F


  );
}
So far, our app now looks like this:
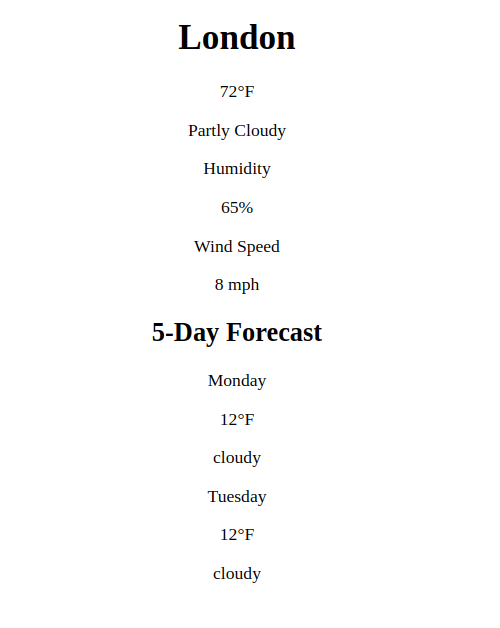
Styling with CSS
To make our interface beautiful, let's add some style, we will use CSS. In the main.jsx file, we already have this import which imports all the global styles for our app
import './index.css'
Let's start by styling the body by using flex.
body {
  min-height: 100vh;
  background: linear-gradient(to bottom right, #60a5fa, #3b82f6);
  display: flex;
  align-items: center;
  justify-content: center;
  padding: 1rem;
  font-family: Arial, sans-serif;
}
Here, we have set justify-items:center and justify-content:centerto ensure all the content is centered horizontally and vertically.
For the wrapper, let's add a different background color, a min-width, a border-radious and a box shadow, and also a margin on all sides.
.wrapper {
  background: rgba(255, 255, 255, 0.2);
  border-radius: 1.5rem;
  padding: 2rem;
  min-width: 400px;
  box-shadow: 0 4px 6px rgba(0, 0, 0, 0.1);
}
Add a bigger font size to the city name and temperature elements and make them bold. The overall styles for the header elements will look like this:
.city {
  font-size: 2.5rem;
  font-weight: bold;
}
.temperature {
  font-size: 3.5rem;
  font-weight: bold;
}

.condition {
  font-size: 1.25rem;

}
To ensure the elements in the weather details section (i.e, humidity and wind speed) are aligned on the same row, use display: flex and justify-content: space-between; These are the styles for the weather detail and its elements:
.weather-details {
  display: flex;
  justify-content: space-between;
  align-items: center;
  margin-bottom: 2rem;
}
Lastly, for the weather forecast section,add the following styles:
.forecast {
  border-top: 1px solid rgba(255, 255, 255, 0.2);
  padding-top: 2rem;
}

.forecast-header {
  font-size: 1.5rem;
  font-weight: bold;
}

.forecast-days {
  display: flex;
  justify-content: space-between;
}

.forecast-day {
  font-weight: bold;
}

.forecast-temp,
.forecast-condition {
  font-size: 0.875rem;
}
Now our App looks like this:
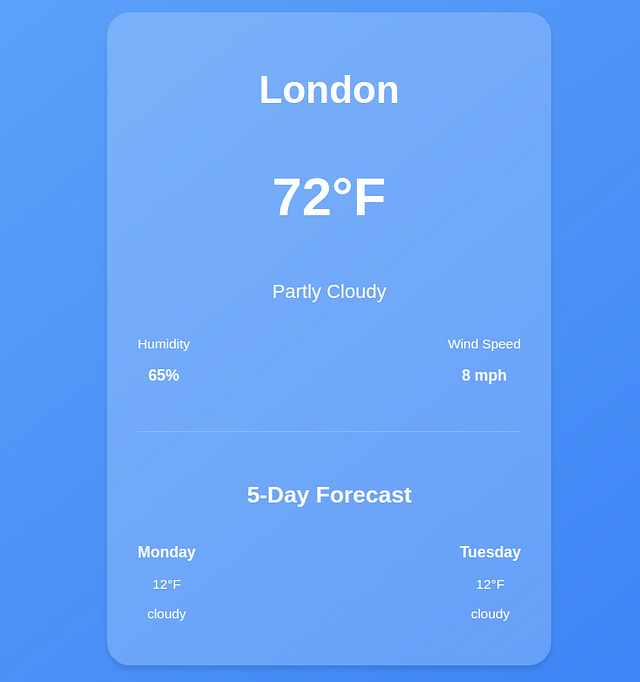
Get Real-Time Weather Data
So far we are using placeholder data, to get real-time weather information, we will use the openweather API. Head over to https://openweathermap.org/api and get a FREE API key.
Define the API_KEY.
function App() {

  const API_KEY ="your_api-key";

}
In a production environment, you should add sensitive data like API keys in a .env file.
Store Weather Data using State
In React, state is a crucial concept because it allows components to manage and respond to dynamic data. When you fetch data from an API, you need a way to store and manipulate that data within your component.
This is where state comes in.
Everything in a React component that can change over time is managed by the state. When the state changes, the React component will rerender and reflect the new changes.
For example, in our weather app, we want to get the current weather information for a specific city and store it in the state.
To do that, we will use the useState hook. The syntax for this hook looks like this:
const [value, setValue] = useState(initialValue);
- value is the current state value.
- setValue is a function that allows you to update the state.
- initialValue is the value that the state starts with (it can be a number, string, object, or even an array).
Define the weather data state at the top of the App function. The initial value will be null
function App() {
  const [weatherData, setWeatherData] = useState(null);
}
- weatherData will store the weather details
- setWeather will update the weather details
Define the state for the city and set the initial state variable of the city name to London
const [city, setCity] = useState("london");
Fetch Data with the useEffect Hook
React by default has no way of handling side effects. Side effects are operations that occur outside of Reacts control such as asynchronous operations, local storage, e.t. c .
Since React components render when they mount, making an API request at this stage will not have access to the data yet since a fetch request takes time to complete.
In such cases, React uses the useEffect hook to perform side effects. The useEffect hook takes a function as the first parameter and a dependency array. Its syntax looks like this:
 useEffect(()=>{

  // perform side effects operations here

},[dependencies] )
The dependency array in the useEffect hook contains variables that determine when the effect should run. For example, in our case, the useEffect should run when the weather data changes rather than on every render.
Inside the useEffect, create an asynchronous function that will fetch the weather for a specific city from the Open weather API. Since it's an asynchronous operation, our function should also be asynchronous.
The function takes the cityName as the parameter
  useEffect(()=>{
    const fetchWeatherData = async (cityName) => {
      const url = `https://api.openweathermap.org/data/2.5/weather?q=${cityName}&appid=${API_KEY}&units=imperial`;
      const response = await fetch(url);
      const data = await response.json();

     }

  })
Once the data is fetched, use the setWeatherData setter function to update the state with the response data. Ensure to wrap your code in a try-catch block to handle any potential errors.
  useEffect(() => {
    const fetchWeatherData = async (cityName) => {
      try {
        const url = `https://api.openweathermap.org/data/2.5/weather?q=${cityName}&appid=${API_KEY}&units=imperial`;
        const response = await fetch(url);
        const data = await response.json();
        setWeatherData(data);
      } catch (error) {
        console.log(error);
      }
    };
  });
For the data to be fetched on mount, we need to invoke the fetch weather data function inside the useEffect.
When invoking the function, we will pass the value of the current city as the argument. This will ensure that when the app mounts for the first time, we already have some data to show for the value specified in the city state.
 useEffect(() => {
    const fetchWeatherData = async (cityName) => {
      try {
        const url = `https://api.openweathermap.org/data/2.5/weather?q=${cityName}&appid=${API_KEY}&units=imperial`;
        const response = await fetch(url);
        const data = await response.json();
        setWeatherData(data);
      } catch (error) {
        console.log(error);
      }
    };

    fetchWeatherData(city)
  });
If you check the logs with your developer tools, you will see that we are making multiple API requests on every render.
This is a very expensive operation,to prevent fetching on every render, we need to provide some dependencies to the useEffect. These dependencies will determine when an API call is made to the open weather API.
So let's add city in the dependency array to ensure API calls will only be made on the first mount or when the value of city changes.
  useEffect(() => {
    const fetchWeatherData = async (cityName) => {
      try {
        const url = `https://api.openweathermap.org/data/2.5/weather?q=${cityName}&appid=${API_KEY}&units=imperial`;
        const response = await fetch(url);
        const data = await response.json();
        setWeatherData(data);
        console.log(data);
      } catch (error) {
        console.log(error.message);
      }
    };

    fetchWeatherData(city)
  },[city]);
When we log the data, we get an object containing the weather details for the city of London.
{
    "coord": {
        "lon": -0.1257,
        "lat": 51.5085
    },
    "weather": [
        {
            "id": 801,
            "main": "Clouds",
            "description": "few clouds",
            "icon": "02d"
        }
    ],
    "base": "stations",
    "main": {
        "temp": 289.65,
        "feels_like": 289.16,
        "temp_min": 288.4,
        "temp_max": 290.92,
        "pressure": 1012,
        "humidity": 69,
        "sea_level": 1012,
        "grnd_level": 1008
    },
    "visibility": 10000,
    "wind": {
        "speed": 5.14,
        "deg": 270
    },
    "clouds": {
        "all": 20
    },
    "dt": 1729349117,
    "sys": {
        "type": 2,
        "id": 2075535,
        "country": "GB",
        "sunrise": 1729319499,
        "sunset": 1729357131
    },
    "timezone": 3600,
    "id": 2643743,
    "name": "London",
    "cod": 200
}
Now let's inject the weather details into the elements using JSX.
{weatherData && weatherData.main && weatherData.weather && (


      {weatherData.name}
      {weatherData.main.temp}°F
      {weatherData.weather[0].main}


        Humidity
        {Math.round(weatherData.main.humidity)}%


        Wind Speed
        {Math.round(weatherData.wind.speed)} mph


  >
)}
In JavaScript, the expression condition && is used for conditional rendering within React components.
The && operator checks two conditions and returns true only if both conditions are true. In our case, if weatherDataexists, the specified data properties will be rendered.
If weatherData is null (or undefined), the elements will not be rendered, preventing any errors that could occur from trying to access properties of null.
Get and Display the Weather Forecast in React
To get the forecast, we will do another fetch request in the same useEffect Hook using this API https://api.openweathermap.org/data/2.5/forecast?q=${CITY}&appid=${API_KEY}&units=imperial
First, create a forecast state to store the forecast data and initialize the initial value to an empty array.
const [forecast, setForecast] = useState([]);
Inside the fetchWeatherData function, make a fetch request to the above API, and set the forecast state to the response data.
  useEffect(() => {
    const fetchWeatherData = async (cityName) => {
      setCity(cityName);
      try {
        const url = `https://api.openweathermap.org/data/2.5/weather?q=${cityName}&appid=${API_KEY}&units=imperial`;
        const response = await fetch(url);
        const data = await response.json();
        setWeatherData(data);
        console.log(data);

        const foreCastresponse = await fetch(
          `https://api.openweathermap.org/data/2.5/forecast?q=${city}&appid=${API_KEY}&units=imperial`
        );
        const forecastdata = await foreCastresponse.json();

        const dailyForecast = forecastdata.list.filter(
          (item, index) => index % 8 === 0
        );
        setForecast(dailyForecast);
      } catch (error) {
        console.log(error.message);
      }
    };

    fetchWeatherData(city);
  }, [city]);
The forecast API usually returns the forecast after every 3 hours for the next 5 days, resulting into 40 data points, here is the truncated output.
{
    "cod": "200",
    "message": 0,
    "cnt": 40,
    "list": [
        {
            "dt": 1729360800,
            "main": {
                "temp": 59.92,
                "feels_like": 58.95,
                "temp_min": 56.59,
                "temp_max": 59.92,
                "pressure": 1013,
                "sea_level": 1013,
                "grnd_level": 1010,
                "humidity": 71,
                "temp_kf": 1.85
            },
            "weather": [
                {
                    "id": 801,
                    "main": "Clouds",
                    "description": "few clouds",
                    "icon": "02n"
                }
            ],
            "clouds": {
                "all": 17
            },
            "wind": {
                "speed": 3.29,
                "deg": 229,
                "gust": 5.64
            },
            "visibility": 10000,
            "pop": 0,
            "sys": {
                "pod": "n"
            },
            "dt_txt": "2024-10-19 18:00:00"
        },
        {
            "dt": 1729371600,
            "main": {
                "temp": 56.8,
                "feels_like": 55.85,
                "temp_min": 54.43,
                "temp_max": 56.8,
                "pressure": 1015,
                "sea_level": 1015,
                "grnd_level": 1012,
                "humidity": 78,
                "temp_kf": 1.32
            },
            "weather": [
                {
                    "id": 803,
                    "main": "Clouds",
                    "description": "broken clouds",
                    "icon": "04n"
                }
            ],
            "clouds": {
                "all": 59
            },
            "wind": {
                "speed": 4.09,
                "deg": 196,
                "gust": 10.11
            },
            "visibility": 10000,
            "pop": 0,
            "sys": {
                "pod": "n"
            },
            "dt_txt": "2024-10-19 21:00:00"
        },
The variable dt is a timestamp, so if we want to convert it to a human-readable time using the toLocaleDateString() method.
new Date(1729360800 * 1000).toLocaleDateString('en-US', { weekday: 'short' })
The output for this timestamp is sat
So for the array of 40 forecast items, we have used the filter function to filter based on the given (item, index) => index % 8 === 0condition.
(item, index) => index % 8 === 0: This condition means: "Only keep the forecast where the index is divisible by 8." Since the forecast is every 3 hours, every 8th item represents one forecast per day (3 hours × 8 = 24 hours).
So for example, given that the indices range from 0–39, every 8th index is added to the dailyForecast array. In total, we will have 5 instances of weather data.
Each weather forecast data point looks like this:
{
            "dt": 1729360800,
            "main": {
                "temp": 59.92,
                "feels_like": 58.95,
                "temp_min": 56.59,
                "temp_max": 59.92,
                "pressure": 1013,
                "sea_level": 1013,
                "grnd_level": 1010,
                "humidity": 71,
                "temp_kf": 1.85
            },
            "weather": [
                {
                    "id": 801,
                    "main": "Clouds",
                    "description": "few clouds",
                    "icon": "02n"
                }
            ],
            "clouds": {
                "all": 17
            },
            "wind": {
                "speed": 3.29,
                "deg": 229,
                "gust": 5.64
            },
            "visibility": 10000,
            "pop": 0,
            "sys": {
                "pod": "n"
            },
            "dt_txt": "2024-10-19 18:00:00"
        }
Since we have 5 instances, we will use the map() method to iterate and display the forecast for each day.
Update the forecast section as follows:
{forecast.length > 0 && (
5-Day Forecast
{forecast.map((day, index) => (
{new Date(day.dt * 1000).toLocaleDateString("en-US", {
weekday: "short",
})}
![{day.weather[0].description}](%7B%60http://openweathermap.org/img/wn/%24%7Bday.weather%5B0%5D.icon%7D.png%60%7D)
{Math.round(day.main.temp)}°F
))}
>
)}
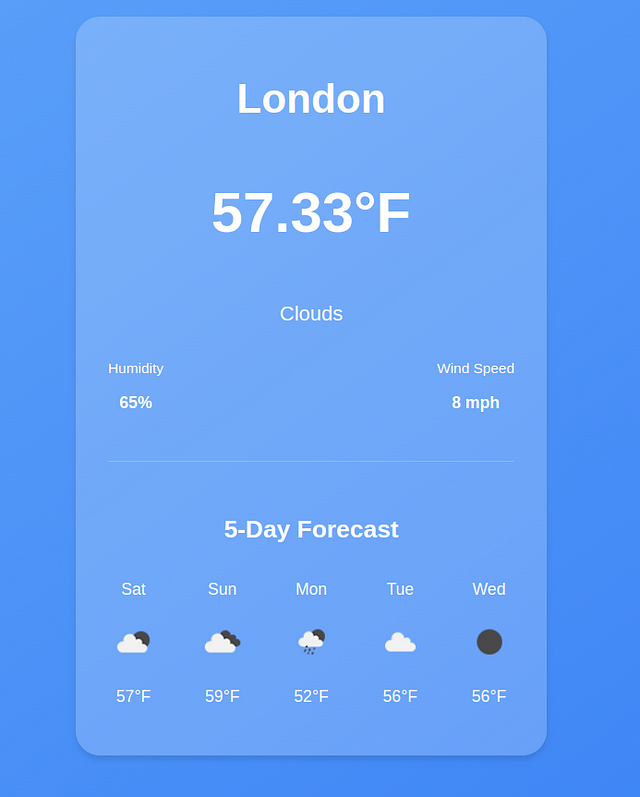
Here, we are also checking if the forecast array contains data to ensure we don't loop over an empty array that will cause errors to pop up.
After checking the forecast data, we map over the forecast array and inject the following data for each day.
- day of the week
- weather icon
- temperature
Now our App looks like this:
Get custom Weather Information
Our app looks great, but we still can't fetch dynamic data. Let's add a search form at the top to allow the users to get information about any city.
But first, we need a state for the input field. Declare the state with an empty string as the initial value.
const [searchInput, setSearchInput] = useState("");
Create the form, bind the input to the searchInput state, and add the onChange event that will update the searchInput value when the user types a new city.
{/* the rest of the code */}
Here are the styles for the form.
.form {
  display: flex;
  justify-content: center;
  align-items: center;
  margin: 20px auto;
  padding: 10px;
  background-color: rgba(255, 255, 255, 0.3);
  border-radius: 10px;
  box-shadow: 0 4px 6px rgba(0, 0, 0, 0.1);
  max-width: 400px;
}

.search-input {
  flex: 1;
  padding: 10px;
  font-size: 16px;
  border: 1px solid rgba(255, 255, 255, 0.6);
  border-radius: 5px 0 0 5px;
  background-color: rgba(255, 255, 255, 0.2);

  outline: none;
  transition: border-color 0.3s ease;
}

.search-input::placeholder {
  color: rgba(255, 255, 255, 0.7);
}

.search-input:focus {
  border-color: #3b82f6;
}

.search-btn {
  padding: 10px 15px;
  font-size: 16px;
  color: white;
  background-color: #3b82f6;
  border: none;
  border-radius: 0 5px 5px 0;
  cursor: pointer;
  transition: background-color 0.3s ease;
}
Since we need to invoke the weatherData function when the form is submitted, we will move the function definition outside the useEffect hook but still call it since the app needs to display some data for the initial city value when it mounts.
const fetchWeatherData = async (cityName) => {
    setCity(cityName);
    try {
      const url = `https://api.openweathermap.org/data/2.5/weather?q=${cityName}&appid=${API_KEY}&units=imperial`;
      const response = await fetch(url);
      const data = await response.json();
      setWeatherData(data);
      console.log(data);

      const foreCastresponse = await fetch(
        `https://api.openweathermap.org/data/2.5/forecast?q=${city}&appid=${API_KEY}&units=imperial`
      );
      const forecastdata = await foreCastresponse.json();

      const dailyForecast = forecastdata.list.filter(
        (item, index) => index % 8 === 0
      );

      setForecast(dailyForecast);
    } catch (error) {
      console.log(error.message);
    }
  };

useEffect(() => {
    fetchWeatherData(city);
  }, [city]);
Get Weather Data when the Form is Submitted
After a user searches for a city with a search form, we need to call another function that will invoke the fetchWeatherData with the new city and update the weatherData state to the weather information for the new city.
Add an onSubmitevent to the form and reference the function as shown below.
When the form is submitted, it will fetch the weather information for the new city.
 function handleSearch(e) {
    e.preventDefault();
    fetchWeatherData(searchInput);
  }
Since the fetchWeatherData function already updates the new state of the weatherData state with the new data, we only invoke the function and pass the value of the new city from the user (searchInput).
Error Handling
When fetching data from API, various issues can occur. For example, in our case, the weather API might be down, or we might have an invalid API key, or we might have exhausted our daily API limit.
In this case, we need to add a proper error-handling mechanism so the user doesn't experience server errors.
For example, when the app loads for the first time, the forecast array will be empty, and the weatherData will be null. To ensure a good user experience, let's add error and loading states.
const [error, setError] = useState(null);
const [loading, setLoading] = useState(false)
In the fetchWeatherData function, just before any fetch happens, set the initial states of error and loading
  const fetchWeatherData = async (cityName) => {
    try {
     setLoading(true)
     setError(null)

     // the rest of the code

}
In the catch block, let's set the error state to a user-friendly message
} catch (error) {
    setError("Couldnt fetch data,please try again")

} finally {
    setLoading(false)

 }
In JavaScript, the finally clause in the try catch block is great for cleaning up. Regardless of the outcome of the API operation, we want to remove the loading state.
catch (error) {
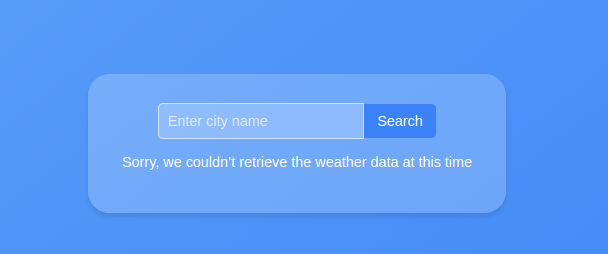
    setError("Sorry, we couldn't retrieve the weather data at this time");

} finally {
    setLoading(false)

 }
To ensure the error and loading states are reflected in the UI, add this code just before the return statement
if (loading) returnLoading...
To display the error message if it occurs add this
tag after the form. {error && {error}
}
This condition ensures that if an error occurs, the error message stored in the state will be displayed.
Here is the app in loading state.

Here is the output when an error occurs.
Conclusion
We have come to the end of this tutorial. You can find the source code here.
If you found this tutorial a bit challenging, you might need to brush up on your React Fundamentals.
Get my Free React Guide and Level up.
Happy Coding.
-
 입력 : "경고 : mysqli_query ()는 왜 매개 변수 1이 mysqli, 주어진 리소스"오류가 발생하고이를 수정하는 방법을 기대 하는가? 출력 : 오류를 해결하는 분석 및 수정 방법 "경고 : MySQLI_QUERY () 매개 변수는 리소스 대신 MySQLI 여야합니다."mysqli_query () mysqli_query ()는 매개 변수 1이 mysqli, 리소스가 주어진 리소스, mysqli_query () 함수를 사용하여 mysql query를 실행하려고 시도 할 때 "경고 : mysqli_query (...프로그램 작성 2025-04-28에 게시되었습니다
 -
 버전 5.6.5 이전에 MySQL의 Timestamp 열을 사용하여 current_timestamp를 사용하는 데 제한 사항은 무엇입니까?5.6.5 이전에 mysql 버전의 기본적으로 또는 업데이트 클로즈가있는 타임 스탬프 열의 제한 사항 5.6.5 5.6.5 이전에 mySQL 버전에서 Timestamp Holumn에 전적으로 기본적으로 한 제한 사항이 있었는데, 이는 제한적으로 전혀 ...프로그램 작성 2025-04-28에 게시되었습니다
 -
 Homebrew에서 GO를 설정하면 명령 줄 실행 문제가 발생하는 이유는 무엇입니까?발생하는 문제를 해결하려면 다음을 수행하십시오. 1. 필요한 디렉토리 만들기 mkdir $ home/go mkdir -p $ home/go/src/github.com/user 2. 환경 변수 구성프로그램 작성 2025-04-28에 게시되었습니다
 -
 MySQL 오류 #1089 : 잘못된 접두사 키를 얻는 이유는 무엇입니까?오류 설명 [#1089- 잘못된 접두사 키 "는 테이블에서 열에 프리픽스 키를 만들려고 시도 할 때 나타날 수 있습니다. 접두사 키는 특정 접두사 길이의 문자열 열 길이를 색인화하도록 설계되었으며, 접두사를 더 빠르게 검색 할 수 있습니...프로그램 작성 2025-04-28에 게시되었습니다
 -
 HTML 서식 태그HTML 서식 요소 **HTML Formatting is a process of formatting text for better look and feel. HTML provides us ability to format text without...프로그램 작성 2025-04-28에 게시되었습니다
 -
 PHP를 사용하여 XML 파일에서 속성 값을 효율적으로 검색하려면 어떻게해야합니까?옵션> 1 varnum "varnum"을 복원 할 수 있습니다. stumped. 이 기능은 XML 요소의 속성에 대한 액세스를 연관 배열로 제공합니다. $ xml = simplexml_load_file ($ file);...프로그램 작성 2025-04-28에 게시되었습니다
 -
 PHP \의 기능 재정의 제한을 극복하는 방법은 무엇입니까?return $ a * $ b; } 그러나 PHP 도구 벨트에는 숨겨진 보석이 있습니다. runkit_function_rename () runkit_function_rename ( 'this', 'that'); run...프로그램 작성 2025-04-28에 게시되었습니다
 -
 FormData ()로 여러 파일 업로드를 처리하려면 어떻게해야합니까?); 그러나이 코드는 첫 번째 선택된 파일 만 처리합니다. 파일 : var files = document.getElementById ( 'filetOUpload'). 파일; for (var x = 0; x프로그램 작성 2025-04-28에 게시되었습니다
 -
 오른쪽에서 CSS 배경 이미지를 찾는 방법은 무엇입니까?/ 오른쪽에서 10px 요소를 배치하려면 / 배경 위치 : 오른쪽 10px 상단; 이 CSS 상단 코너는 오른쪽 상단의 왼쪽에서 10 pixels가되어야합니다. 요소의 상단 에지. 이 기능은 Internet Explorer 8 또는 이...프로그램 작성 2025-04-28에 게시되었습니다
 -
 크롬에서 상자 텍스트를 선택하는 방법은 무엇입니까?초기 시도 한 가지 일반적인 접근 방식은 다음과 같습니다. 주) & lt;/옵션 & gt; & lt; 옵션> select .lt {text-align : center; } <option value=""&a...프로그램 작성 2025-04-28에 게시되었습니다
 -
 MySQLI로 전환 한 후 Codeigniter가 MySQL 데이터베이스에 연결 해야하는 이유문제를 디버깅하려면 파일 끝에 다음 코드를 추가하고 출력을 검토하는 것이 좋습니다. echo ''; print_r ($ db ); echo ''; echo '데이터베이스에 연결 :'. $ db ; $ dbh = mysq...프로그램 작성 2025-04-28에 게시되었습니다
 -
 선형 구배 배경에 줄무늬가있는 이유는 무엇이며 어떻게 고칠 수 있습니까?수직 지향적 구배의 경우, 신체 요소의 마진은 HTML 요소로 전파되어 8px 키가 큰 영역을 초래합니다. 그 후, 선형 등급은이 전체 높이에 걸쳐 확장되어 반복 패턴을 생성합니다. 솔루션 : 이 문제를 해결하기 위해 신체 요소에 충분한 높이가 있는지...프로그램 작성 2025-04-28에 게시되었습니다
 -
 Visual Studio 2012의 DataSource 대화 상자에 MySQL 데이터베이스를 추가하는 방법은 무엇입니까?MySQL 커넥터 v.6.5.4가 설치되어 있지만 Entity 프레임 워크의 DataSource 대화 상자에 MySQL 데이터베이스를 추가 할 수 없습니다. 이를 해결하기 위해 MySQL 용 공식 Visual Studio 2012 통합은 MySQL 커넥터 v.6....프로그램 작성 2025-04-28에 게시되었습니다
 -
 `JSON '패키지를 사용하여 이동하는 JSON 어레이를 구문 분석하는 방법은 무엇입니까?JSON 어레이를 Parsing JSON 패키지 문제 : JSON 패키지를 사용하여 어레이를 나타내는 JSON 스트링을 어떻게 구문 분석 할 수 있습니까? 예 : type JsonType struct { Array []string ...프로그램 작성 2025-04-28에 게시되었습니다
 -
 PHP 배열 키-값 이상 : 07 및 08의 호기심 사례 이해이 문제는 PHP의 주요 제로 해석에서 비롯됩니다. 숫자가 0 (예 : 07 또는 08)으로 접두사를 넣으면 PHP는 소수점 값이 아닌 옥탈 값 (기본 8)으로 해석합니다. 설명 : echo 07; // 인쇄 7 (10 월 07 = 10 진수 7) ...프로그램 작성 2025-04-28에 게시되었습니다
중국어 공부
- 1 "걷다"를 중국어로 어떻게 말하나요? 走路 중국어 발음, 走路 중국어 학습
- 2 "비행기를 타다"를 중국어로 어떻게 말하나요? 坐飞机 중국어 발음, 坐飞机 중국어 학습
- 3 "기차를 타다"를 중국어로 어떻게 말하나요? 坐火车 중국어 발음, 坐火车 중국어 학습
- 4 "버스를 타다"를 중국어로 어떻게 말하나요? 坐车 중국어 발음, 坐车 중국어 학습
- 5 운전을 중국어로 어떻게 말하나요? 开车 중국어 발음, 开车 중국어 학습
- 6 수영을 중국어로 뭐라고 하나요? 游泳 중국어 발음, 游泳 중국어 학습
- 7 자전거를 타다 중국어로 뭐라고 하나요? 骑自行车 중국어 발음, 骑自行车 중국어 학습
- 8 중국어로 안녕하세요를 어떻게 말해요? 你好중국어 발음, 你好중국어 학습
- 9 감사합니다를 중국어로 어떻게 말하나요? 谢谢중국어 발음, 谢谢중국어 학습
- 10 How to say goodbye in Chinese? 再见Chinese pronunciation, 再见Chinese learning


